

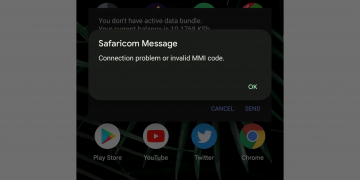


Updating your Xiaomi Mi Box S can result in a boot loop and this will need to be fixed. This happened to me when I received an update notification and I proceeded to download as usual. Upon installation, it got stuck in a boot loop. Xiaomi Logo kept flashing and blinking continuously instead of loading Android TV. This took me some time to figure out. All it needed was flashing an older recovery version of Android TV for Xiaomi Mi Box S and running the update to the latest available version in the system update location under settings.
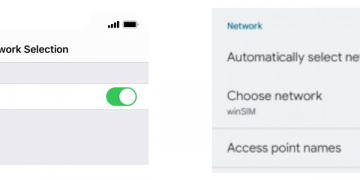
Before you attempt the process below, I would recommend trying this simpler method of manually updating your Android TV software on your Xiaomi Mi Box S though the chances of success are slim. It is still worth trying since you do not need to buy anything nor is it physically involving with the possibility of working. Worth trying before proceeding with the steps below.
These are steps to fixing Xiaomi Mi Box S Internation Version. Model: MDZ-22-AB.
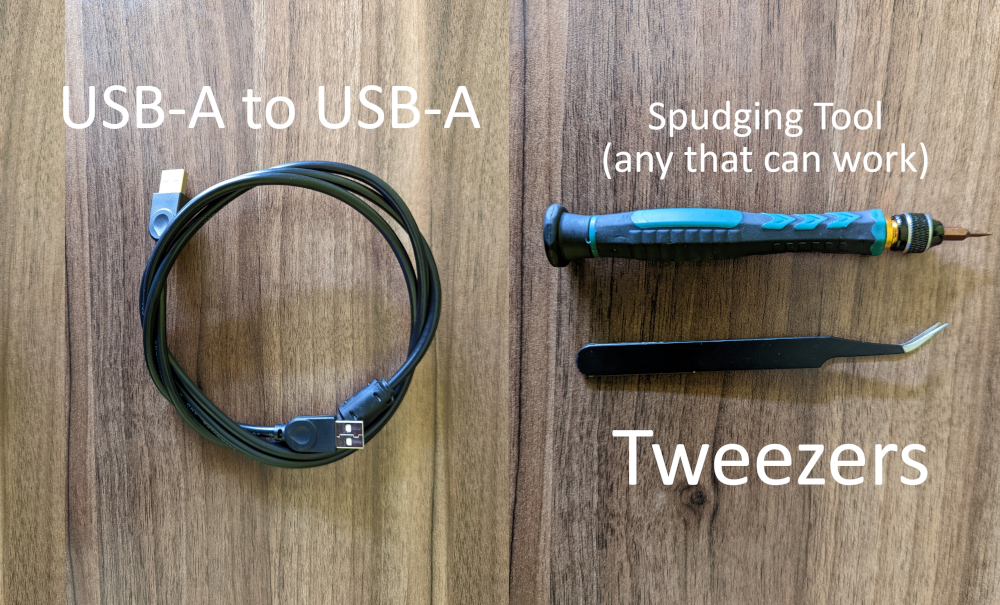
Requirements to Fix Xiaomi Mi Box S boot loop
USB-A to USB-A
USB Type A to USB Type A male to male connector allows you to connect your Mi Box S to your computer.
This connector isn’t commonly available so you will likely need to buy it. It is about USD 3.
Opening tool
The opening tool will assist you to quickly open the Mi Box S with no or minimal physical damage. My Mi Box S got some scratches in the process but nothing major.
Tweezers
Tweezers will be crucial in resetting your Mi Box S.
You can use a short wire and it will work perfectly okay.
Windows computer with USB 2.0 port
This process only works with USB 2.0 computers. I tried using a USB 3.0 with no success.
Check your computer’s manual or motherboard specification to accurately identify this port.
Modern computers come equipped with USB 3.0 or higher ports and one or two USB 2.0 ports. Accurately locate this so you can use it to fix your Mi Box S without any glitch. If you cannot locate a USB 2.0 port on your computer, try all the ports with the steps below till you find the one that works. This may be tedious if you have a lot of USB ports.
Recovery firmware for Xiaomi Mi Box S
This is Android TV 8.2 for Xiaomi Mi Box S. It is the software that you are downgrading to. Your Mi Box S likely already had Android 9. You will upgrade it to Android 9 once the recovery firmware is flashed.
Download Xiaomi Mi Box S recovery firmware to your Windows computer. Download, Extract the file and note the location of the .img file.
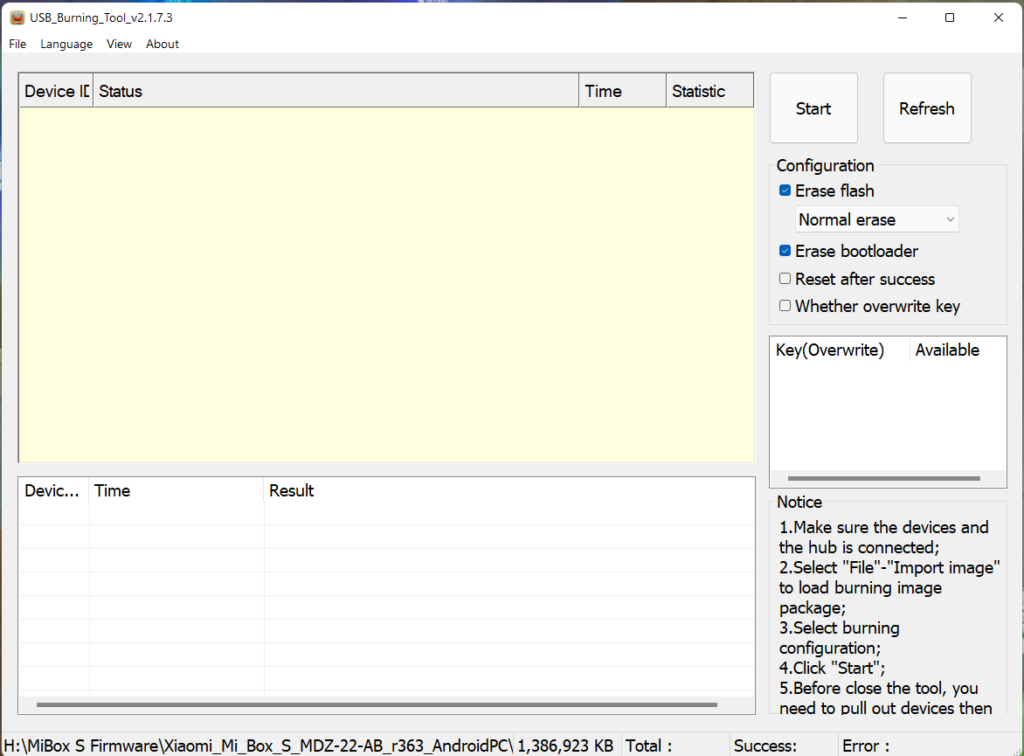
Amlogic USB Burning Tool
Amlogic USB Burning Tool is software to be installed on your Windows computer that will assist in burning the downloaded recovery firmware to your Xiaomi Mi Box S.
Download the Amlogic USB Burning Tool version 2.1.7.3. I tried other versions with minimal success. They could work for your case but you’re better off with the version that is proven to work. Download then extract and install the software on your computer.
Password
This is the password that you’ll import to your Amlogic burning tool. Download the file then extract the password.bin file and note the location of this file.
I suggest putting the two files in a single location on your computer.
Steps to fix Xiaomi Mi Box S boot loop
Prepare the USB Burning Tool
Launch the USB Burning Tool then navigate to View > InPut Password then navigate to the downloaded password.bin file and select it.
Select the Android TV software to the flashed by navigating to File > Import Image then select the Xiaomi_Mi_Box_S_MDZ-22-AB_oneday_r363_20181012_AndroidPC.img file you downloaded from the steps above.
Ensure that the Erase Flash and Erase Bootloader options are checked under configuration.
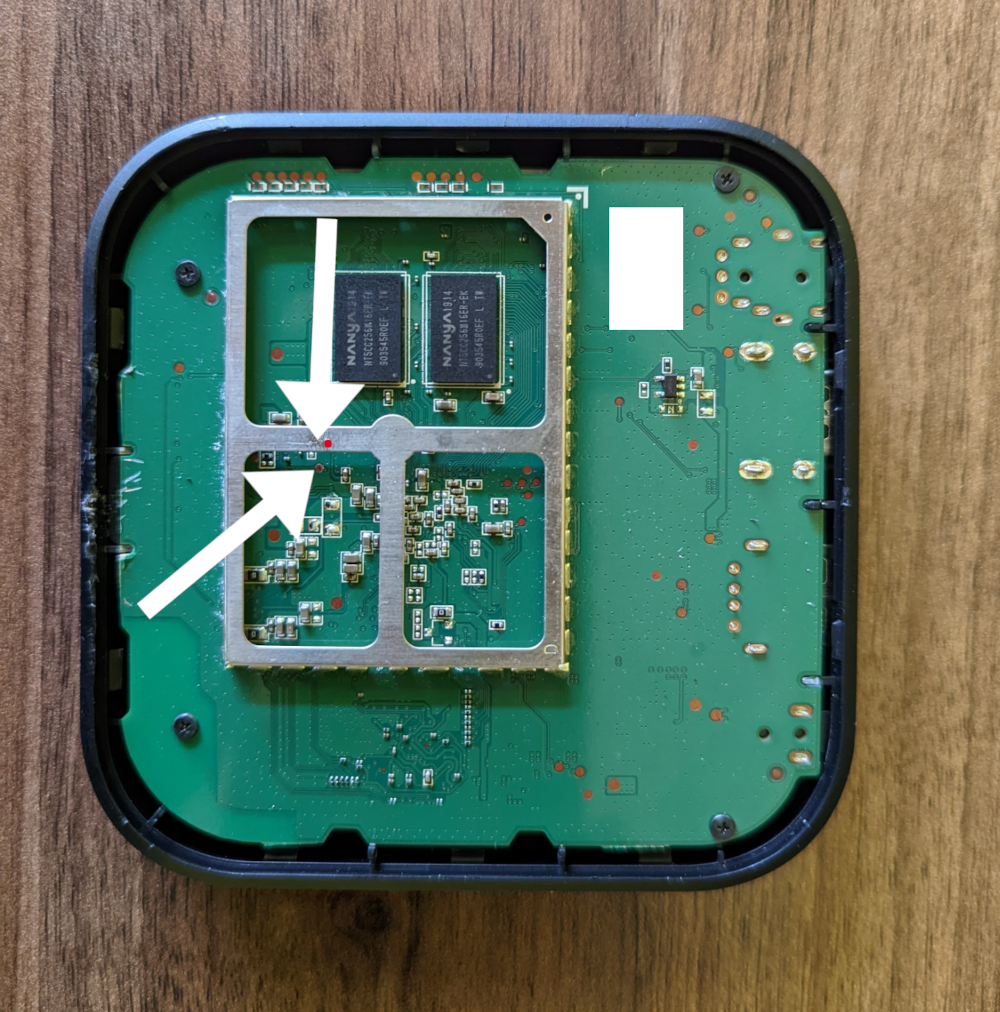
Open the Xiaomi Mi Box S
Pry open the Xiaomi Mi Box S using the opening tool. Wiggle your way around the box till the lid pops open.
Pop open the shiny metallic lid covering the middle section to reveal three triangle sections with two black modules and other components.

Connect the Mi Box S to your Computer
Connect your Xiaomi Mi Box S to a USB 2.0 port on your computer with the USB Burning Tool using the USB-A to USB-A cable. USB 3.0 ports on your computer won’t work.
Do not connect the power cord yet.
Reset the Mi Box S
Use the tweezers or a short wire to reset the Xiaomi Mi Box S by shorting the two sections shown below. Connect the shiny metallic frame-looking piece of metal to the copper-looking grey dot on the motherboard as shown below.
Connect the power cord while shorting the box. You will hear a chiming sound from your computer when this is successful.
Put the shorting tweezers or the wire aside and move over to your computer while the Box is still connected to the computer and power.
Flash recovery firmware
Press Start on the USB Burning Tool to flash the recovery software to your Xiaomi Mi Box S.
The progress bar will proceed to 100% and finish successfully. Do not touch the box to cables till it has completed at 100% and shows a green bar.

Flashing the recovery firmware should take about 4 minutes. In the end, you should see the message 100%: Burning Successfully in a gree label.
Unplug your device and connect it to your television set. Connect to Wi-Fi, sign in to your Google account then update your Xiaomi Mi Box S to Android TV 9.0.
You may also want to install some of the best apps for your Android TV.
Troubleshooting Failed Xiaomi Mi Box S Flashing
- Check that you have plugged in the USB 2.0 port on your computer. It will not work on USB 3.0 or higher.
- Check the connections to make sure that they are appropriately plugged in. Loose connections can cause it it abort and fail.
- Plug in a different USB 2.0 port. Your computers USB 2.0 might be faulty and plugging in to another USB 2.0 port will allow it to work.
- Interchange the procedures above by first resetting the Mi Box S then pluggin in to the computer.
These steps should fix the Xiaomi Mi Box S boot loop and blinking Xiaomi logo for now and any other update that will come along.
Não deu certo em nenhuma das alternativas, com o aquivo puto o controle remoto e o wi-fi não funcionam, e depois quando atualizo o programa fica em looping novamente. Help-me, please.
Hello, please double-check the instructions once more. Make sure you are using the correct ports on your computer and you see a success message on the flashing tool.
Não deu certo em nenhuma das alternativas, com o android puro, o controle remoto e o wi-fi não funcionam, e depois quando atualizo o programa fica em looping novamente. Me ajude, por favor.
Controle e wi-fi não funcionam após a instalação do Android puro. E se eu atualizar para o Android 9 pelo pen drive entra em looping novamente. Me ajuda , por favor.
Hi Vincent thanks for your guide it works wonders but Im actually having the same issue Robson have after installation the remote doesn’t work neither the Wifi do you have any ideas thanks in advance.
I’m glad this worked. Try pairing the remote once more. In the meantime, you can plug in a keyboard to enter your Wi-Fi password.
Hello there. Is there a similar way to unbrick a Xiaomi mi tv stick? After a normal update, it shows only the startup black screen and I can not enter recovery mode with the remote control.
Thanks
Hello, I do not presently have a tutorial for that.
Thanks Bro this really works but the issue am having now is the Wi-Fi connection is not working again
I have a keyboard but still the Wi-Fi toggle is not turning on. Please help
It appears your network drivers were not installed. Repeat the procedure once more. This normally fixes such issues.
I have flashed it many times now still the same issue
I have same problem.wifi and controller dosent work.plz help
You’ll need to part your controller and connect to Wi-Fi.
Hello and thank you for this wonderful tutorial, the problem now is that it is impossible for me to pair the remote control,
anyone have the solution?
thank you
Hello Sam,
Try pairing your remote by putting them closer or even the two touching then press the app switcher and home button together for a few seconds. The remote should start pairing. Connect to your Wi-Fi network.
HI, I tried to follow your instructions with no luck, the PC do not recognize the box with any of the 2.0 USB ports it has. When I plug in the power cord, the only thing the Mi box does is to flash a red light that comes out from the audio port (I assume it is a digital optic connection). Any suggestion of what else can I do to restore my box? I’m lost!
Hi,
Try redoing the installation once more. Sometimes you have to try it more than once for it to work.
Hi
I do all the steps successfully. After rebooting mi box, it cannot detect my remote even I press two button for it and hold it. But nothing happens.
Please help me.
Hi, pair the remote once more. Press the two button when the Mi Box and your remote are touching each other. It should be that close.
Thank you for the tutorial.
I have tried multiple times, but always the same result. Do you perhaps have any advice?
[19:47:58 432][Global][Inf]–USB_Burning_Tool soft Version: V2.1.7.3
[19:47:58 432][Global][Inf]–Windows Version: Microsoft Windows 10, Bit: 64
[19:47:58 446][Global][Inf]–Scan usb device
[19:47:58 446][Global][Inf]–Aml scan WorldCup Device
[19:47:58 447][Global][Inf]–Host: USB xHCI Compliant Host Controller
[19:47:58 447][Global][Inf]–DevPath:\\?\pci#ven_1022&dev_149c&subsys_7c021462&rev_00#4&1fde7688&0&0341#{3abf6f2d-71c4-462a-8a92-1e6861e6af27}
[19:47:58 447][Global][Inf]—->Roothub:USB#ROOT_HUB30#5&2b84cf7b&0&0#{f18a0e88-c30c-11d0-8815-00a0c906bed8}
[19:47:58 447][Global][Inf]——–>[Port0]NoDeviceConnected
[19:47:58 447][Global][Inf]——–>[Port1]NoDeviceConnected
[19:47:58 447][Global][Inf]——–>[Port2]NoDeviceConnected
[19:47:58 447][Global][Inf]——–>[Port3]NoDeviceConnected
[19:47:58 447][Global][Inf]——–>[Port4]NoDeviceConnected
[19:47:58 447][Global][Inf]——–>[Port5]NoDeviceConnected
[19:47:58 447][Global][Inf]——–>[Port6]NoDeviceConnected
[19:47:58 447][Global][Inf]——–>[Port7]NoDeviceConnected
[19:47:58 447][Global][Inf]–Host: USB xHCI Compliant Host Controller
[19:47:58 448][Global][Inf]–DevPath:\\?\pci#ven_1022&dev_43d5&subsys_11421b21&rev_01#4&2c18e2e3&0&000b#{3abf6f2d-71c4-462a-8a92-1e6861e6af27}
[19:47:58 448][Global][Inf]—->Roothub:USB#ROOT_HUB30#5&4087d53&1&0#{f18a0e88-c30c-11d0-8815-00a0c906bed8}
[19:47:58 448][Global][Inf]——–>[Port0]NoDeviceConnected
[19:47:58 448][Global][Inf]——–>[Port1]USB#VID_2109&PID_0817#6&2ad7cfc7&1&2#{f18a0e88-c30c-11d0-8815-00a0c906bed8}
[19:47:58 448][Global][Inf]———->[Port0]NoDeviceConnected
[19:47:58 448][Global][Inf]———->[Port1]NoDeviceConnected
[19:47:58 448][Global][Inf]———->[Port2]NoDeviceConnected
[19:47:58 448][Global][Inf]———->[Port3]NoDeviceConnected
[19:47:58 448][Global][Inf]——–>[Port2]NoDeviceConnected
[19:47:58 448][Global][Inf]——–>[Port3]NoDeviceConnected
[19:47:58 448][Global][Inf]——–>[Port4]NoDeviceConnected
[19:47:58 448][Global][Inf]——–>[Port5]USB#VID_2109&PID_2817#6&2ad7cfc7&1&6#{f18a0e88-c30c-11d0-8815-00a0c906bed8}
[19:47:58 448][Global][Inf]———->[Port0]NoDeviceConnected
[19:47:58 448][Global][Inf]———->[Port1]NoDeviceConnected
[19:47:58 448][Global][Inf]———->[Port2]NoDeviceConnected
[19:47:58 448][Global][Inf]———->[Port3]NoDeviceConnected
[19:47:58 448][Global][Inf]——–>[Port6]NoDeviceConnected
[19:47:58 449][Global][Inf]——–>[Port7]Other device
[19:47:58 449][Global][Inf]——–>[Port8]NoDeviceConnected
[19:47:58 449][Global][Inf]——–>[Port9]NoDeviceConnected
[19:47:58 449][Global][Inf]——–>[Port10]NoDeviceConnected
[19:47:58 449][Global][Inf]——–>[Port11]Other device
[19:47:58 450][Global][Inf]——–>[Port12]Other device
[19:47:58 450][Global][Inf]——–>[Port13]NoDeviceConnected
[19:47:58 450][Global][Inf]–Scan USB host controller complete
[19:47:58 450][Global][Inf]–Update data center with HubMap
[19:47:58 450][Global][Inf]–Scan end
[19:48:08 988][Global][Inf]–User click open button
[19:48:10 888][Global][Inf]–Image path D:\Xiaomi\Xiaomi_Mi_Box_S_MDZ-22-AB_r363_AndroidPC\Xiaomi_Mi_Box_S_MDZ-22-AB_oneday_r363_20181012_AndroidPC.img
[19:48:10 889][Global][Inf]–OpenImg D:\Xiaomi\Xiaomi_Mi_Box_S_MDZ-22-AB_r363_AndroidPC\Xiaomi_Mi_Box_S_MDZ-22-AB_oneday_r363_20181012_AndroidPC.img
[19:48:14 397][Global][Inf]–check img crc success!
[19:48:14 397]Parse platform.conf
[19:48:14 398][Global][Inf]–Parsing burning package
[19:48:14 398][Global][Inf]–Load configuration file C:\Program Files (x86)\Amlogic\USB_Burning_Tool\temp
[19:48:14 398][Global][Inf]–Parse burning configuration file C:\Program Files (x86)\Amlogic\USB_Burning_Tool\temp\burn_config.xml
[19:48:14 400][Global][Inf]–Get burning key
[19:48:29 304][Global][Inf]–Catch DBT_DEVICEARRIVAL
[19:48:29 305][Global][Inf]–Scan usb device
[19:48:29 305][Global][Inf]–Aml scan WorldCup Device
[19:48:29 306][Global][Inf]–Host: USB xHCI Compliant Host Controller
[19:48:29 306][Global][Inf]–DevPath:\\?\pci#ven_1022&dev_149c&subsys_7c021462&rev_00#4&1fde7688&0&0341#{3abf6f2d-71c4-462a-8a92-1e6861e6af27}
[19:48:29 306][Global][Inf]—->Roothub:USB#ROOT_HUB30#5&2b84cf7b&0&0#{f18a0e88-c30c-11d0-8815-00a0c906bed8}
[19:48:29 306][Global][Inf]——–>[Port0]NoDeviceConnected
[19:48:29 306][Global][Inf]——–>[Port1]NoDeviceConnected
[19:48:29 306][Global][Inf]——–>[Port2]NoDeviceConnected
[19:48:29 306][Global][Inf]——–>[Port3]NoDeviceConnected
[19:48:29 306][Global][Inf]——–>[Port4]NoDeviceConnected
[19:48:29 306][Global][Inf]——–>[Port5]NoDeviceConnected
[19:48:29 306][Global][Inf]——–>[Port6]NoDeviceConnected
[19:48:29 306][Global][Inf]——–>[Port7]NoDeviceConnected
[19:48:29 307][Global][Inf]–Host: USB xHCI Compliant Host Controller
[19:48:29 307][Global][Inf]–DevPath:\\?\pci#ven_1022&dev_43d5&subsys_11421b21&rev_01#4&2c18e2e3&0&000b#{3abf6f2d-71c4-462a-8a92-1e6861e6af27}
[19:48:29 307][Global][Inf]—->Roothub:USB#ROOT_HUB30#5&4087d53&1&0#{f18a0e88-c30c-11d0-8815-00a0c906bed8}
[19:48:29 309][Global][Inf]——–>[Port0]NoDeviceConnected
[19:48:29 309][Global][Inf]——–>[Port1]USB#VID_2109&PID_0817#6&2ad7cfc7&1&2#{f18a0e88-c30c-11d0-8815-00a0c906bed8}
[19:48:29 309][Global][Inf]———->[Port0]NoDeviceConnected
[19:48:29 309][Global][Inf]———->[Port1]NoDeviceConnected
[19:48:29 309][Global][Inf]———->[Port2]NoDeviceConnected
[19:48:29 309][Global][Inf]———->[Port3]NoDeviceConnected
[19:48:29 312][Global][Inf]——–>[Port2]NoDeviceConnected
[19:48:29 315][Global][Inf]——–>[Port3]NoDeviceConnected
[19:48:29 315][Global][Inf]——–>[Port4]NoDeviceConnected
[19:48:29 318][Global][Inf]——–>[Port5]USB#VID_2109&PID_2817#6&2ad7cfc7&1&6#{f18a0e88-c30c-11d0-8815-00a0c906bed8}
[19:48:29 318][Global][Inf]———->[Port0]NoDeviceConnected
[19:48:29 318][Global][Inf]———->[Port1]NoDeviceConnected
[19:48:29 318][Global][Inf]———->[Port2]NoDeviceConnected
[19:48:29 318][Global][Inf]———->[Port3]NoDeviceConnected
[19:48:29 325][Global][Inf]——–>[Port6]\\?\usb#vid_1b8e&pid_c003#6&2ad7cfc7&1&7#{a5dcbf10-6530-11d2-901f-00c04fb951ed}
[19:48:29 325][Global][Inf]——–>[Port7]Other device
[19:48:29 325][Global][Inf]——–>[Port8]NoDeviceConnected
[19:48:29 325][Global][Inf]——–>[Port9]NoDeviceConnected
[19:48:29 325][Global][Inf]——–>[Port10]NoDeviceConnected
[19:48:29 325][Global][Inf]——–>[Port11]Other device
[19:48:29 326][Global][Inf]——–>[Port12]Other device
[19:48:29 326][Global][Inf]——–>[Port13]NoDeviceConnected
[19:48:29 326][Global][Inf]–Scan USB host controller complete
[19:48:29 326][Global][Inf]–Update data center with HubMap
[19:48:29 326][Global][Inf]–Insert new hub2
[19:48:29 326][Global][Inf]–Update hub2 device data
[19:48:29 326][Global][Inf]–Update HUB2-1
[19:48:29 326][HUB2-1][Inf]–Update device path
[19:48:29 326][Global][Inf]–Update HUB2-2 \\.\USB#VID_2109&PID_0817#6&2ad7cfc7&1&2#{f18a0e88-c30c-11d0-8815-00a0c906bed8}
[19:48:29 326][HUB2-2][Inf]–Update device path
[19:48:29 326][Global][Inf]–Update HUB2-3
[19:48:29 326][HUB2-3][Inf]–Update device path
[19:48:29 326][Global][Inf]–Update HUB2-4
[19:48:29 326][HUB2-4][Inf]–Update device path
[19:48:29 326][Global][Inf]–Update HUB2-5
[19:48:29 326][HUB2-5][Inf]–Update device path
[19:48:29 326][Global][Inf]–Update HUB2-6 \\.\USB#VID_2109&PID_2817#6&2ad7cfc7&1&6#{f18a0e88-c30c-11d0-8815-00a0c906bed8}
[19:48:29 326][HUB2-6][Inf]–Update device path
[19:48:29 326][Global][Inf]–Update HUB2-7 \\?\usb#vid_1b8e&pid_c003#6&2ad7cfc7&1&7#{a5dcbf10-6530-11d2-901f-00c04fb951ed}
[19:48:29 326][HUB2-7][Inf]–Update device path
[19:48:29 327][Global][Inf]–Begin thread for HUB2-7
[19:48:29 327][Global][Inf]–Burning thread HUB2-7 start
[19:48:29 327][Global][Inf]–Update HUB2-8
[19:48:29 327][HUB2-8][Inf]–Update device path
[19:48:29 327][Global][Inf]–Burning thread HUB2-7 begin run
[19:48:29 327][Global][Inf]–Update HUB2-9
[19:48:29 327][HUB2-9][Inf]–Update device path
[19:48:29 327][Global][Inf]–Update HUB2-10
[19:48:29 327][HUB2-10][Inf]–Update device path
[19:48:29 327][Global][Inf]–Update HUB2-11
[19:48:29 327][HUB2-11][Inf]–Update device path
[19:48:29 327][Global][Inf]–Update HUB2-12
[19:48:29 327][HUB2-12][Inf]–Update device path
[19:48:29 327][Global][Inf]–Update HUB2-13
[19:48:29 327][HUB2-13][Inf]–Update device path
[19:48:29 327][Global][Inf]–Update HUB2-14
[19:48:29 327][HUB2-14][Inf]–Update device path
[19:48:29 327][Global][Inf]–Add Hub2: \\.\USB#ROOT_HUB30#5&4087d53&1&0#{f18a0e88-c30c-11d0-8815-00a0c906bed8} to m_HubDeviceDataVector
[19:48:29 327][Global][Inf]–Scan end
[19:48:34 000][Global][Inf]–User click start button
[19:48:34 001][Global][Inf]–SetErase
[19:48:34 001][Global][Inf]–Enable burning 1
[19:48:34 001][Global][Inf]–Scan usb device
[19:48:34 001][Global][Inf]–Aml scan WorldCup Device
[19:48:34 002][Global][Inf]–Host: USB xHCI Compliant Host Controller
[19:48:34 002][Global][Inf]–DevPath:\\?\pci#ven_1022&dev_149c&subsys_7c021462&rev_00#4&1fde7688&0&0341#{3abf6f2d-71c4-462a-8a92-1e6861e6af27}
[19:48:34 002][Global][Inf]—->Roothub:USB#ROOT_HUB30#5&2b84cf7b&0&0#{f18a0e88-c30c-11d0-8815-00a0c906bed8}
[19:48:34 002][Global][Inf]——–>[Port0]NoDeviceConnected
[19:48:34 002][Global][Inf]——–>[Port1]NoDeviceConnected
[19:48:34 002][Global][Inf]——–>[Port2]NoDeviceConnected
[19:48:34 002][Global][Inf]——–>[Port3]NoDeviceConnected
[19:48:34 002][Global][Inf]——–>[Port4]NoDeviceConnected
[19:48:34 002][Global][Inf]——–>[Port5]NoDeviceConnected
[19:48:34 002][Global][Inf]——–>[Port6]NoDeviceConnected
[19:48:34 002][Global][Inf]——–>[Port7]NoDeviceConnected
[19:48:34 003][Global][Inf]–Host: USB xHCI Compliant Host Controller
[19:48:34 003][Global][Inf]–DevPath:\\?\pci#ven_1022&dev_43d5&subsys_11421b21&rev_01#4&2c18e2e3&0&000b#{3abf6f2d-71c4-462a-8a92-1e6861e6af27}
[19:48:34 003][Global][Inf]—->Roothub:USB#ROOT_HUB30#5&4087d53&1&0#{f18a0e88-c30c-11d0-8815-00a0c906bed8}
[19:48:34 003][Global][Inf]——–>[Port0]NoDeviceConnected
[19:48:34 003][Global][Inf]——–>[Port1]USB#VID_2109&PID_0817#6&2ad7cfc7&1&2#{f18a0e88-c30c-11d0-8815-00a0c906bed8}
[19:48:34 003][Global][Inf]———->[Port0]NoDeviceConnected
[19:48:34 003][Global][Inf]———->[Port1]NoDeviceConnected
[19:48:34 003][Global][Inf]———->[Port2]NoDeviceConnected
[19:48:34 003][Global][Inf]———->[Port3]NoDeviceConnected
[19:48:34 003][Global][Inf]——–>[Port2]NoDeviceConnected
[19:48:34 003][Global][Inf]——–>[Port3]NoDeviceConnected
[19:48:34 003][Global][Inf]——–>[Port4]NoDeviceConnected
[19:48:34 003][Global][Inf]——–>[Port5]USB#VID_2109&PID_2817#6&2ad7cfc7&1&6#{f18a0e88-c30c-11d0-8815-00a0c906bed8}
[19:48:34 003][Global][Inf]———->[Port0]NoDeviceConnected
[19:48:34 003][Global][Inf]———->[Port1]NoDeviceConnected
[19:48:34 003][Global][Inf]———->[Port2]NoDeviceConnected
[19:48:34 003][Global][Inf]———->[Port3]NoDeviceConnected
[19:48:34 004][Global][Inf]——–>[Port6]\\?\usb#vid_1b8e&pid_c003#6&2ad7cfc7&1&7#{a5dcbf10-6530-11d2-901f-00c04fb951ed}
[19:48:34 004][Global][Inf]——–>[Port7]Other device
[19:48:34 004][Global][Inf]——–>[Port8]NoDeviceConnected
[19:48:34 004][Global][Inf]——–>[Port9]NoDeviceConnected
[19:48:34 004][Global][Inf]——–>[Port10]NoDeviceConnected
[19:48:34 004][Global][Inf]——–>[Port11]Other device
[19:48:34 004][Global][Inf]——–>[Port12]Other device
[19:48:34 004][Global][Inf]——–>[Port13]NoDeviceConnected
[19:48:34 004][Global][Inf]–Scan USB host controller complete
[19:48:34 005][Global][Inf]–Update data center with HubMap
[19:48:34 005][Global][Inf]–Update hub2 device data
[19:48:34 005][Global][Inf]–Update HUB2-1
[19:48:34 005][HUB2-1][Inf]–Update device path
[19:48:34 005][Global][Inf]–Update HUB2-2 \\.\USB#VID_2109&PID_0817#6&2ad7cfc7&1&2#{f18a0e88-c30c-11d0-8815-00a0c906bed8}
[19:48:34 005][HUB2-2][Inf]–Update device path
[19:48:34 005][Global][Inf]–Update HUB2-3
[19:48:34 005][HUB2-3][Inf]–Update device path
[19:48:34 005][Global][Inf]–Update HUB2-4
[19:48:34 005][HUB2-4][Inf]–Update device path
[19:48:34 005][Global][Inf]–Update HUB2-5
[19:48:34 005][HUB2-5][Inf]–Update device path
[19:48:34 005][Global][Inf]–Update HUB2-6 \\.\USB#VID_2109&PID_2817#6&2ad7cfc7&1&6#{f18a0e88-c30c-11d0-8815-00a0c906bed8}
[19:48:34 005][HUB2-6][Inf]–Update device path
[19:48:34 005][Global][Inf]–Update HUB2-7 \\?\usb#vid_1b8e&pid_c003#6&2ad7cfc7&1&7#{a5dcbf10-6530-11d2-901f-00c04fb951ed}
[19:48:34 005][HUB2-7][Inf]–Update device path
[19:48:34 005][Global][Inf]–Update HUB2-8
[19:48:34 005][HUB2-8][Inf]–Update device path
[19:48:34 005][Global][Inf]–Update HUB2-9
[19:48:34 005][HUB2-9][Inf]–Update device path
[19:48:34 005][Global][Inf]–Update HUB2-10
[19:48:34 005][HUB2-10][Inf]–Update device path
[19:48:34 005][Global][Inf]–Update HUB2-11
[19:48:34 005][HUB2-11][Inf]–Update device path
[19:48:34 005][Global][Inf]–Update HUB2-12
[19:48:34 005][HUB2-12][Inf]–Update device path
[19:48:34 005][Global][Inf]–Update HUB2-13
[19:48:34 005][HUB2-13][Inf]–Update device path
[19:48:34 005][Global][Inf]–Update HUB2-14
[19:48:34 005][HUB2-14][Inf]–Update device path
[19:48:34 005][Global][Inf]–Scan end
[19:48:34 033][HUB2-7][Inf]–Open device handle \\?\usb#vid_1b8e&pid_c003#6&2ad7cfc7&1&7#{a5dcbf10-6530-11d2-901f-00c04fb951ed} 0x00000a18
[19:48:34 095][HUB2-7][Inf]–CloneImageProxy
[19:48:34 095][Global][Inf]–OpenImg D:\Xiaomi\Xiaomi_Mi_Box_S_MDZ-22-AB_r363_AndroidPC\Xiaomi_Mi_Box_S_MDZ-22-AB_oneday_r363_20181012_AndroidPC.img
[19:48:34 095][HUB2-7][Inf]–Connect path=USB xHCI Compliant Host Controller/P0/P6
[19:48:34 095][HUB2-7][Inf]–Start burning…
[19:48:34 157][HUB2-7][Inf]————–ERASE BOOTLOADER————
[19:48:34 266][HUB2-7][Inf]–start SendIdentifyCmd
[19:48:34 268][HUB2-7][Inf]–2-4-0-0
[19:48:34 268][HUB2-7][Inf]————-Download DDR.USB———–
[19:48:34 271][HUB2-7][Inf]–2-4-0-0
[19:48:34 271][HUB2-7][Inf]–Test Identify support
[19:48:34 277][HUB2-7][Inf]–Identify return: 2-4-0-0-1-0
[19:48:34 277][HUB2-7][Inf]–Get Password!
[19:48:41 311][HUB2-7][Inf]–Identify return: 2-4-0-0-1-1
[19:48:41 311][HUB2-7][Inf]–Control write pll reg1 0xd9000000:0x000000b1
[19:48:41 821][HUB2-7][Inf]–Control write pll reg1 0xd9000000:0x00005183
[19:48:42 333][HUB2-7][Inf]–Test Identify support
[19:48:42 335][HUB2-7][Inf]–Identify support 6byte
[19:48:42 338][HUB2-7][Inf]–Identify return: 2-4-0-0-1-1
[19:48:42 338][HUB2-7][Inf]–Control write pll reg1 0xd9000000:0x000000b1
[19:48:42 845][HUB2-7][Inf]–Control write pll reg1 0xd9000000:0x00005183
[19:48:43 356][HUB2-7][Inf]–Write initial succeed
[19:48:43 356][HUB2-7][Inf]–Upload encrypt at 0xc8100228
[19:48:43 359][HUB2-7][Inf]–ulValue = 0xbdfd71be
[19:48:43 359][HUB2-7][Inf]–File change to DDR_ENC.USB
[19:48:43 359][HUB2-7][Inf]–Read encrypt value succeed
[19:48:43 359][HUB2-7][Inf]–Download DDR_ENC.USB,size: 49152!
[19:48:43 371][HUB2-7][Inf]–Transfer complete 49152
[19:48:43 374][HUB2-7][Inf]–Run at address 0xd9000000
[19:48:43 379][HUB2-7][Inf]–RunInRam success
[19:48:43 422][HUB2-7][Inf]–2-2-0-8-0-1-0-0
[19:48:43 422][HUB2-7][Inf]–CheckFileRunState return 8
[19:48:43 422][HUB2-7][Inf]–Run at address 0xd900c000
[19:48:43 428][HUB2-7][Inf]–RunInRam succeed
[19:48:58 638][HUB2-7][Err]–usbReadFile failed ret = -116
[19:48:58 638][HUB2-7][Err]–ReadPara failed
[19:48:58 644][HUB2-7][Err]–[0x10105002]Romcode/Initialize DDR/Read initialize status/USB Control setup error
[19:48:58 644][HUB2-7][Inf]–Close device handle 0x00000a18
There are generally few mistakes that can happens. Ensure that you have loaded the password .bin file. Plug in the male to male connector to a USB 2.0 port. Short the mi box then plug in power. This put the TV box in download mode. Start flushing and remove the shorting cable. If you get a fail error then try again by clicking the start button.
I have just done this after Android 12 botched update.
Hi, same with me..problem with remote cannot pair and wifi can’t enable.. please help.
Hi, I hope you are well
Concerning the xiaomi mi box s firmware that you published, I have a problem connecting the remote control with the xiaomi box and also the Wifi.
If you have another version or other solution please send it to me.
Thanks in advance.
Hello, here is Android 12 for Xiaomi Mi Box S. You can manually flash this instead.
Why do you say ERASE BOOTLOADER? Other guides say DO NOT ERASE FLASH, DO NOT ERASE BOOTLOADER?
That worked for me. You can try without then if it doesn’t work erase it.
By deleting the bootloader you delete the DRM and also the Wi-Fi and Bluetooth connections
Thanks for the HELP! worked for me,
if someone having problems with the remote control or offline wifi just plug Enternet cable with keyboard and update the box after this fix.
after the update everything fixed !
Thanks for your help Vincent ! I was able to restore my Xiaomi mi box S after the android 12 proposed update (“update-oneday_s_4467-user”) just destroyed everything 🙁
As mentioned several times in the comments above Vincent update will lead to an Android 8 fresh install but the remote control and the wifi won’t work
The solution proposed by Ariel is working just fine: you need an ethernet connection and a keybord connected through an USB hub and from them you will be able to update to Android 9 and both Wifi and Remote will be back
Also note that I did not ticked the “Erase bootloader” option since it is reported in some forums that it may destroy your DRMs (no sure of that but I did not take the risk)
I am glad this was helpful.
I’ll update clarifying the two options; one to clarify the risk enabling the Erase bootloader and the other with the procedure to use remote control. Mine worked by pairing it once more. It should be close to the box though, preferably touching it if possible.
Well I had the same problem with the wifi and the control that did not recognize what I used was to put the keyboard in HDMI-CEC to control with the TV control, then I bought a USB-RJ45 as soon as I connected it I found an update, a restart and everything worked normally